Critics of WordPress often complain that it is merely a blogging engine with feature bloat. While it’s true that WordPress started life as a blogging engine, over the years a number of features have been added that raise it from an application focused on one specific task to a flexible content management system. One of the more important of these functions is custom fields, and while these are widely used by WordPress developers and professionals, they’re often not well understood by the average WordPress user, which is a shame because they’re a very useful content management tool.
Custom fields are essentially a way of associating arbitrary metadata with posts. They consist of two parts, a key and a value. The key is the name of the custom field, and the value is its ‘content’. A trivial example of using a custom field would be to use a ‘location’ field to store the coordinates at which a post was written by a travel blogger. You can create as many custom fields per post as you need, and they can store any sort of textual data, which includes URLs, embed codes, and even custom CSS.
One of the reasons that most people aren’t aware of custom fields is that by default they are hidden and don’t appear in the standard post ‘Add New Post’ dialogue. It is, however, easy to turn them on using the ‘Screen Options’ dialogue at the top right of that page.
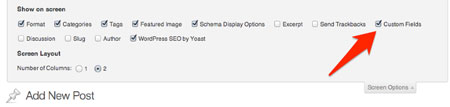
Activating Custom Fields
When shown, the custom field dialogue appears at the bottom of the post creation page.
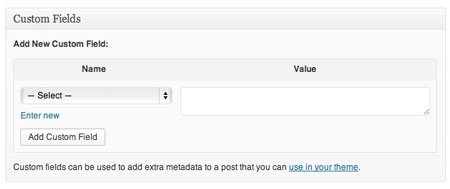
The dialogue is fairly self-explanatory; you can either select an existing custom field from the drop-down or create a new one. After you’ve created a custom field it will appear in the drop-down in the future.
So far, so uninteresting. Being able to associate metadata with posts is cool, but it’s not particularly useful until you understand what you can do with it. To get the most from custom fields, you’ll need to edit the PHP of some of your WordPress files, but in most cases it’s a simple cut-and-paste job.
To carry on with our earlier example: our travel blogger would like to include his location beneath the title on each blog post. To do that we create a custom field with the key ‘Reporting From’ and the name of the location as the value.
To display the results of our custom field, we’d simply add the following to our WordPress site’s theme files somewhere within the loop: <?php the_meta(); ?>
In this example we’re using the new default 2013 theme and adding the function to its content.php file.

The custom field data is shown as a bullet list of the key/value pairs(of course, in a real-world scenario you would style it with CSS).

The ‘the_meta’ function simply takes the list of custom fields associated with a post and prints out a bullet list, but that’s the most trivial example of what you can do with custom fields. Because they can store textual data and be accessed from anywhere within the loop, their data can be displayed on any post or page within WordPress, the display can be controlled using PHP conditional statements, they can be used to select specific posts for display, and they can be used to selectively add HTML or CSS to posts.
For a fuller explanation of how to take advantage of conditional statements, check out the WordPress Codex.
About Graeme Caldwell — Graeme works as an inbound marketer for Nexcess, a leading provider of Magento and WordPress hosting. Follow Nexcess on Twitter at @nexcess, Like them on Facebook and check out their tech/hosting blog, http://blog.nexcess.net.
About the Author

Mirko Humbert
Mirko Humbert is the editor-in-chief and main author of Designer Daily and Typography Daily. He is also a graphic designer and the founder of WP Expert.