There is no doubt that MP4 (MPEG-Part 14) is one of the best and most popular multimedia container formats. It is the global standard for making movies, music, and other videos because it provides high resolution, the best graphics, and clear audio. But despite having so many prominent features, MP4 video files are prone to corruption like any other format. When this happens, naturally, such files become inaccessible for playback.
If you’re facing playback issues due to MP4 file corruption, don’t worry. There are several methods to repair inaccessible video files of the MP4 format, and this article will guide you through some of them. But before that, let’s understand the reasons behind the corruption of MP4 video files.
Reasons for MP4 video file corruption
A video file can become inaccessible due to any issue appearing from its source to its notation on any storage device. Here are some of the reasons how an MP4 video file can be damaged or corrupted.
Error while reading or writing data
Any error that arises in your hard drive because of file system issues or bad sectors is a common factor behind the corruption of MP4 videos stored on it.
Background application interruptions
When an MP4 video file is in use, interruptions from background applications can break the video codec and this can make it inoperable.
Interrupted download
If the video is downloaded from the internet but the download process was interrupted unexpectedly before completion, you can end up with a corrupted MP4 video file.
Viruses or malware
Malware on the storage device can interrupt the reading or writing process of a video file, and any virus can alter the file extension, making an MP4 video unplayable.
Sudden system shutdown
Regular shutdowns of your system in an improper way affect every file on your system including MP4 files, especially when they are in play.
How to repair corrupt MP4 files
1. Different techniques with VLC Media Player (Suitable for Windows devices)
The VLC media player is quite known to most PC users for playing different video formats. It is very lightweight and is capable of performing many audio and video variations during playback. But what is even greater is the player’s ability to automatically fix video files that are unable to play.
There are multiple methods with which broken or corrupted MP4 files can be fixed using VLC. A few are listed below:
1. VLC media player’s Convert/Save option
Just follow these steps to repair MP4 video files using VLC player’s Convert/Save option:
- Launch the VLC media player and click on the Media tab in the upper right corner.
- From the drop-down list that opens, select the Convert/Save option to open the conversion window
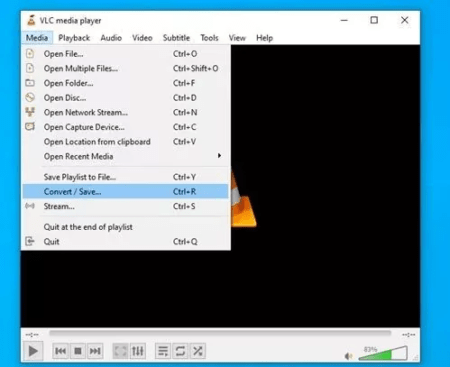
- In this window, click on the Add button to add the video file you want to repair. Then click on Convert to convert the MP4 file to AVI format (the default video format supported by VLC – this process will also fix the problems with it).
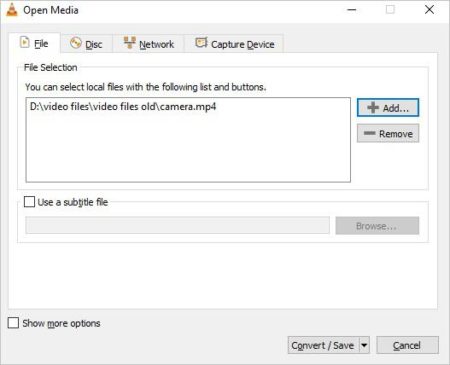
- After you click on Convert, another window will open which will enable you to modify the settings of the conversion. Choose a codec there and select the location of the converted file.
- After setting everything, click on Start to begin the conversion.
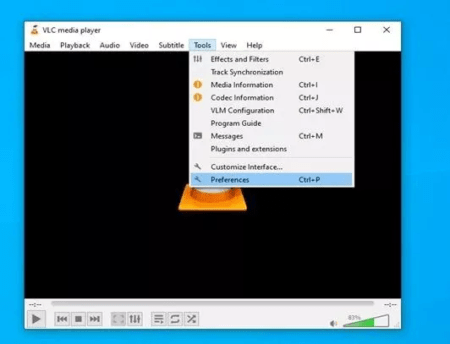
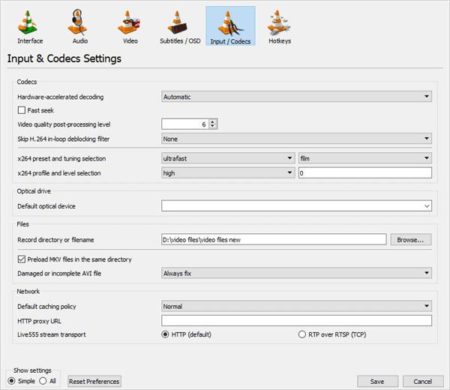
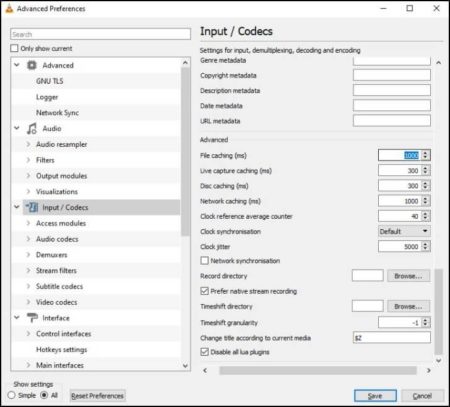
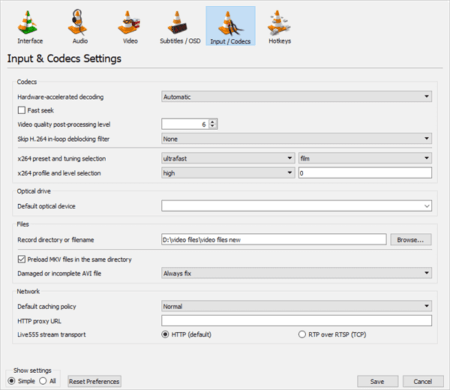
- Once the process is complete, go to the Tools tab and click on the Preferences option. Thereafter, click on the Inputs/Codecs option.
- When the window opens, click on the Damaged or Incomplete AVI File option to open its drop-down menu, and from it, select Always Fix.
- Click on the Save option to proceed and then try to play your video, it should work fine.
2. Alter cache values in VLC media player
Increasing cache values in VLC media player can also repair video lags and freeze associated with them. Follow these steps to raise the cache value of your VLC media player:
- Launch VLC media player and click on the Tools tab
- From the drop-down list that opens, click on the Preferences option
- Now click on Show Settings and two options will appear – Simple and All. Select “All”
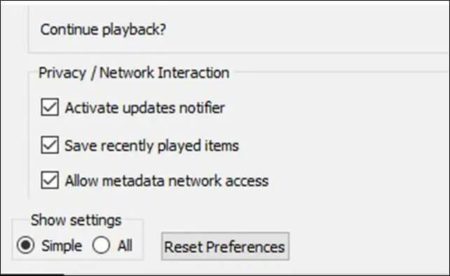
- Against the File caching (ms) text, you will have to increase the cache value to 1000.
- Lastly click on Save
- Restart VLC player and then try to play your MP4 video. It should play just fine.
- Change VLC player’s video output settings
VLC media player allows you to automatically repair corrupted MP4 files simply by altering its video output settings. Here are the steps to follow:
- Launch VLC and go to Tools -> Preferences

- In the window that opens, click on Video to open the video settings
- Now from the given options, locate the drop-down in front of the Output option
- From the drop-down, select DirectX (DirectDraw) video output
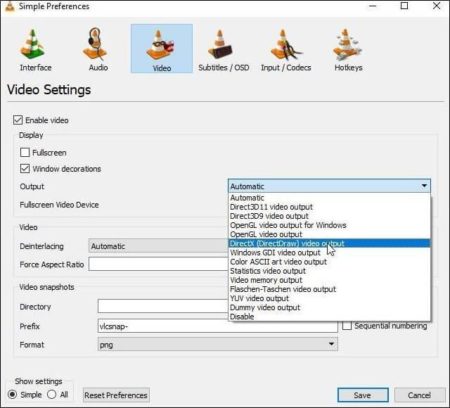
- Finally click on Save and re-launch the player. Your videos should play fine now
- Duplicate the file, rename, and fix with VLC
It may sound absurd, but some users have reported that simply replicating the corrupted video file (creating a new copy at a different location), renaming its extension to AVI and force repairing it with VLC has helped them fix the damage.
Here are the steps you can follow:
- Create a copy of the MP4 file at a different location/volume of your hard drive
- Change the file format to AVI by simply renaming it
- Launch VLC and navigate to Tools -> Preferences -> Input / Codecs
- Find the option Damaged or incomplete AVI file, and from the drop-down in front of it, select Always Fix
- Now click on Save to apply the changes
- Finally open the damaged video file in VLC and see if it plays.
- Repair corrupted MP4 video files with QuickTime (Suitable for Mac)
Similar to VLC player on Windows systems, the QuickTime media player performs the functionality of repairing broken or corrupted video files on Mac based systems.
Here are the steps you can use:
- Launch QuickTime on Mac and open the video file in it
- From the main menu, go to Window -> Show Movie Inspector to open detailed description of the MP4 file. If the file is corrupted, you will see a black screen at this point
- Now click on Edit from the menu and then click Preferences -> QuickTime Preferences
- Next, click on Update and once it completes, restart QuickTime
Now your video should play fine.
3. Repair corrupted MP4 video file with a Stellar Repair for Video
If you’ve tried all of the above-listed methods and still have failed to repair corrupted MP4 video files, using good video repair software is your final resort. Video repair software comes with highly advanced repair algorithms which can fix any severe problem within your videos in no time.
You can use Stellar Repair for Video to repair any video file format like MP4, AVI, MOV, 3GP, etc. It is one of the easiest to use video repair tools that can repair your MP4 videos on external storage devices as well. It is quite efficient and time-saving as it supports batch repairing of videos on Windows and Mac devices.
Follow these steps to use this software to repair corrupted MP4 video files:
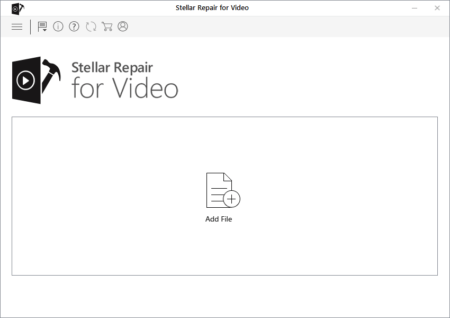
- Download and launch Stellar Repair for Video on your computer device
- From the home screen, click on the Add File option to select the videos you want to be repaired
- Click on the Repair button to initiate the repair process. The repair process will begin to repair your videos and an indicator will show you the progress of the process.
- After the repair is completed, all fixed files are listed in a tree-view in the left-hand panel of the software interface. Double-click any file here to see its preview in the right-hand panel.
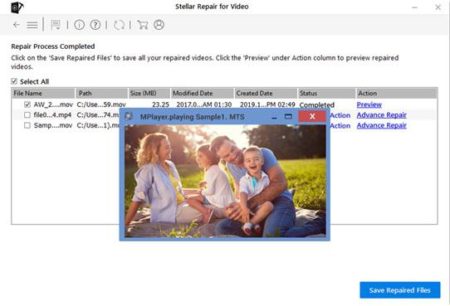
- If you’re satisfied with the results, you can save the videos to the desired location by clicking on the Save Repaired File option.
- After this, you will be able to play the repaired files without any issues.
Wrap Up
This article discusses all the possible causes and the best methods to repair corrupted MP4 video files. You can try these methods according to the level of the problem you face while playing your videos. You just have to remember one thing – you should always perform these methods on the copies of your video files because you could lose the original one sometimes. Thus, before trying any of these methods, make a duplicate file and then try fixing it.
About the Author

Peter Makeshoff
Peter Makeshoff is the founder and main author of Designer Daily.